I always liked the idea of developing mobile applications, but also found the Objective C + XCode experience not very enjoyable. I gave alternatives like Titanium a try, but wasn’t fully convinced. Lately I’ve been getting into RubyMotion and so far I’m really impressed by the general feel of it.
Alas it’s not perfect. My main grief right now about the project is the terrible lack of documentation. The community is also still small and while you can still find helpful people, you often end up alone with your code. That’s why I figured I would contribute my share of blog posts on the subject! Hopefully it’ll help out some people.
Keep in mind that while I’m well versed in Ruby, I’m quite new to RubyMotion and might make some mistakes… so please comment if I do and I’ll fix the article. RubyMotion is also evolving, therefore while this article works perfectly today, it might not be the case in a few months.
With all that in mind, let’s get started shall we?
Prerequisites
I won’t get into the details on how to set up a project and will assume you have basic knowledge of how this works. If you never created something with RubyMotion, please take a look at this tutorial before reading the rest of this article.
RubyMotion uses Ruby. If you are not familiar with it, there are tons of tutorials and books on how to code with this language. I recommend Learn Ruby The Hard Way by Zed A. Shaw.
Our Objective
I’ll try to explain how to customize a UISlider to get the look and feel matching the design of your application.
Setting up the AppDelegate
This is pretty basic, we just set up a controller and assign it to be the root.
class AppDelegate
  def application(application, didFinishLaunchingWithOptions:launchOptions)
	@window = UIWindow.alloc.initWithFrame(UIScreen.mainScreen.bounds)

	main_controller = MainController.alloc.init
	@window.rootViewController = main_controller

	@window.rootViewController.wantsFullScreenLayout = true
	@window.makeKeyAndVisible
	true
  end
end
Displaying a UISlider
Now we need to create the MainController. I like to put it in app/controllers, with the usual basic structure.
class MainController \< UIViewController
  def loadView
	self.view = UIView.new
  end

  def initWithNibName(name, bundle: bundle)
	super
	self
  end

  def viewDidLoad
	super
	# Everything is now going to go there
  end
end
Now you can run the application with rake and it’ll display a black screen. This means we’re all set up and it’s time to actually start coding. Everything we’re going to write from now on will be after the super the viewDidLoad method.
First, the slider:
slider = UISlider.alloc.initWithFrame([[0, 200], [320, 40]])This will create a slider taking the whole width of the screen and position it more or less in the center. Once it’s created, we need to add it to the view so it’ll display correctly.
view.addSubview(slider)Run rake again, and you should see something like this:

If you want, you can set the maximum and default values:
slider.maximumValue = 100
slider.value = slider.maximumValue/2
Setting Track Images
A UISlider is composed of different elements. The sliding thingy is called the track and the other round thingy you grab to drag is the thumb. On the left of the thumb we have the minimum track, on the right the maximum track. The official documentation explains that with a better display of vocabulary than I do, but you get the idea.
Let’s change the track image to display an image.
full\_image = UIImage.imageNamed("full")
empty\_image = UIImage.imageNamed("empty")
slider.setMinimumTrackImage full\_image, forState: UIControlStateNormal
slider.setMaximumTrackImage empty\_image, forState: UIControlStateNormal
You can notice that I use two images “full” and “empty”. To get them to load correctly, put them in the resources folder of your rubymotion project. If they are PNGs you don’t need to specify the format.
Right now the minimum track image is stretching to fit its space. It might be what you want, but that’s not my case so let’s add the following code before giving the image to the slider.
# You need an image that is the exact size of the slider
# or else it might not look good
full\_image = full\_image.resizableImageWithCapInsets(
  UIEdgeInsetsZero, resizingMode: UIImageResizingModeTile)
At this point we have this:
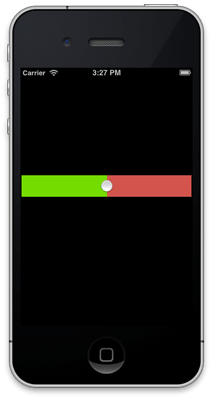
This is pretty good, but the thumb in the middle doesn’t look like it belongs. Let’s fix that.
Customizing The Thumb
You can pass an image to set the thumb to whatever you want using the same logic as what we did with the tracks. Personally I prefer removing the thumb entirely, so here’s how to do that:
slider.setThumbImage UIImage.alloc, forState: UIControlStateNormalThis gives you:
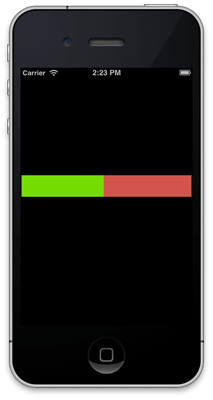
Of course you could have done something like:
whatever = UIImage.imageNamed("whatever")
slider.setThumbImage whatever, forState: UIControlStateNormal
Making The Slider Easier to Slide
Right now it’s looking how we want it, but the problem is the thumb is hidden, but you still have to click exactly where it used to be in order to change the slider’s value. Since the UISlider is taller than the default one, you have to click right in the middle of your new slider in order to grab it.
That’s not good UX. In order to avoid this we can enlarge the size of the area that is selectable:
slider.trackRectForBounds(
  CGRect.new(CGPoint.new(200,200), CGSize.new(100,100)))
Depending on the size of your images and the general feeling you want to get, play around with this area you’re defining.
That’s It!
Obviously these are not the only customizations you can make to a UISlider, but I think it’s a good start. If people are interested I might make another one on events or visual tricks you can use to make a slider look cooler.
If you find this avalanche of code snippets not very usable, you can look at the whole project on github. It is compiling and working as I write this article, but keep in mind that RubyMotion is a fast moving project and it might not be the case in a few months.
Since you scrolled this far, you might be interested in some other things I wrote: